Environmental control of damp
Physical damp-proof courses have been compulsory in all buildings
constructed since around 1875. In houses built from 1880 to around 1920
this would have been a horizontal layer of slates overlapping to form a
continuous barrier at the base of the wall, usually at the same height
of the air bricks Around 1930 slate was superseded by bitumen
impregnated hessian which has now given way to the bitumen free
polymeric damp-proof courses.
Slate and hessian/bitumen damp-proof courses are still fairly effective
in controlling rising dampness from the ground and there should never be
any need any replacement damp-proof courses (chemical, physical,
electro-osmosis or siphon tubes) as most cases of 'rising damp' can be
attributed to low-level penetrating dampness where water is sitting at
the base of a wall or where the original damp-proof course has been
bridged by raised ground levels. Both of these situations create a
'moisture reservoir' allowing water ingress at the base of the wall
which then migrates through the brickwork by capillary action and this
then appears as rising damp internally.
Instead of installing a chemical damp-proof course it is usually easier
and cheaper to tackle the problem externally by reducing ground levels
or installing drainage channels to prevent bridging and repairing any
drainage and guttering defects which may be causing ponding externally.
Once these works have been carried out then the walls will dry out
gradually and there is usually no need to remove plaster internally so
as well as saving money by not having to have damp-proofing work done
then all the mess and disruption of plastering and re-decorating
internally is also avoided.
Even if there is any slight passage of moisture through the old damp
course it rarely causes any problems internally as the rate of
evaporation from the wall above the damp course is usually greater than
the uptake of moisture below the damp course.
Inadequate sub-floor ventilation is often a cause of dampness in walls
as this tends to cause a build up of moisture in the floor void which
can condense on the exposed masonry and timbers. Much of the condensate
will be above the damp course and will then migrate upwards to appear as
'rising damp' internally. The easiest way to deal with this is to
install extra air bricks at the base of the walls and ensure that there
is an adequate through draught of air to remove moisture from the void,
this will also help to reduce the moisture level of floor timbers and
reduce the risk of decay and infestation.
Most of the damp situations that we encounter during our surveys are
usually remedied without the need for any form of damp-proofing works.
If the control of damp can be addressed by balancing the ingress of
moisture and the evaporation rate of dampness through moisture
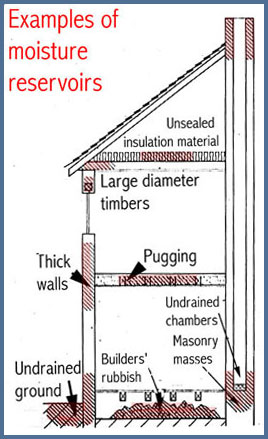
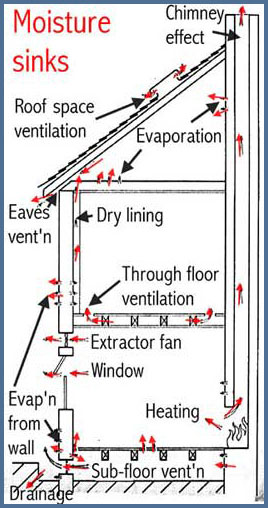
reservoirs and moisture sinks ( see diagrams ) then this
should be sufficient to prevent any internal damage to plaster,
skirtings and sub-floor timbers.
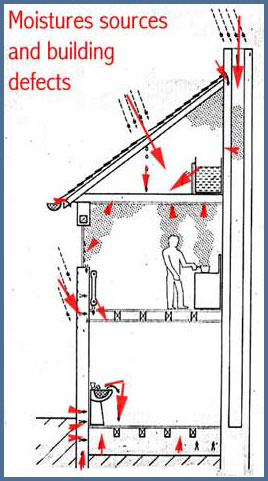
Before considering the concept of moisture reservoirs and
moisture sinks the external fabric of the property should be
inspected and any obvious defects repaired. This may seem obvious but we
get numerous calls to remedy rising or penetrating dampness and the
source of the moisture is often a leaking downpipe or cistern overflow.
Internal pipe leaks are also often a cause of dampness that can be
misinterpreted as rising damp and many of our clients have been
recommended to have damp-proofing works where the cause of damp was from
a leaking shower unit and was easily rectified with a tube of silicon
mastic.
The most common moisture reservoirs that create rising damp are
undrained ground and raised ground levels bridging existing damp-proof
courses. This allows low-level moisture ingress which then migrates
through the wall by capillary action and can appear as 'rising damp'
internally affecting plaster, skirtings and other timbers abutting the
damp walls. Reducing ground levels and installing drainage or
ventilating channels at the base of the affected walls will remove the
source of moisture and create a moisture sink by allowing evaporation
from the exposed wall.
Usually no plastering is required as the walls should dry out gradually
but if the plaster needs to be renewed we find that the best option is
to use a combined damp-proofing and insulating system with a damp-proof
membrane such as Newlath 500 or Delta Plaster-Lath fitted to the damp
walls which is then over-boarded with Larfarge Thermacheck plasterboard
or Walltransform Insulating Plaster. As well as providing a damp-free
internal finish ready for decorating, the U-value ( on a standard 9
inch/225mm thickness wall ) will be reduced in accordance with Building
Regulations (Part L Conservation of Fuel and Power ) to around 0.3 which
results in less heat loss through walls and lower energy bills and will
provide full payback within 15 years.
Another major moisture sink is sub-floor ventilation. If existing air
bricks are cleaned out and additional sub-floor vents installed then the
improved ventilation under the floor will provide lower humidity levels
and help to purge excess moisture from the sub-floor void. The lack of
effective ventilation often causes water vapour to condense on the
exposed masonry in the floor void which can then travel up the wall by
capillary action and appear as 'rising damp' The increased air flow
prevents this from happening and also reduces the moisture content of
floor timbers such as joists, wall-plates and floorboards etc thereby
reducing the risk of fungal decay and insect infestation, providing less
justification for the use of chemical treatments to prevent woodworm or
wet and dry rot.
Installing extra air bricks also has the benefit of reducing damp in the
solid walls above them and the effect is similar to that described by G
& I Massari in their book 'Damp Buildings, Old and New'. They showed how
the water absorbed by a porous material is slowed by reducing the area
of the base in contact with the moisture source. Three bricks were
inserted into a water source. One with the whole cross section of 14cm
intact, another with a 5cm section cut out to leave 9cm in contact with
the water and a third brick with 9cm cut out leaving 5cm available to
water. The different rates of absorption in each brick can be seen in
the figure below with the rising wet front reaching the top of the brick
with times ranging from 5 hours for the full brick to 33 hours for the
brick with 9cm removed. Full saturation of the full brick as a result of
capillary absorption and air diffusion would take approximately two
years.
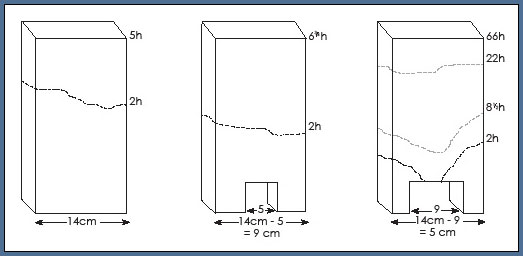
The experiment demonstrated that reducing the inflow area greatly
extends the time it takes for water to rise to the top of the brick: by
a factor of 7 in the brick shown on the right, where the area of the
header face in contact with the water is reduced by around two-thirds.
The perforated profile of air bricks acts in the same way as the reduced
section bricks and helps to slow down the upward passage of moisture in
walls and when extra air bricks are installed in conjunction with ground
reduction/drainage channels then these are usually sufficient along with
the original physical damp-proof course to prevent any rising dampness
occurring internally.
The Massari effect is also beneficial to chemical damp-proofing and the
siphon tube system where the drilling of holes at regular intervals
reduces the surface area available to moisture and therefore reduces the
capillary effect of any rising damp and we have on occasion been
instructed to install siphon systems internally behind skirtings to gain
some of these advantages without having the unsightly holes on the
outside walls.
If you need any more information about chemical-free, environmentally
friendly damp control then please call us on 020 8226 3101 or e-mail
enquiries@dampbuster.co.uk
tel: 020 8226 3101 email: enquiries@dampbuster.co.uk